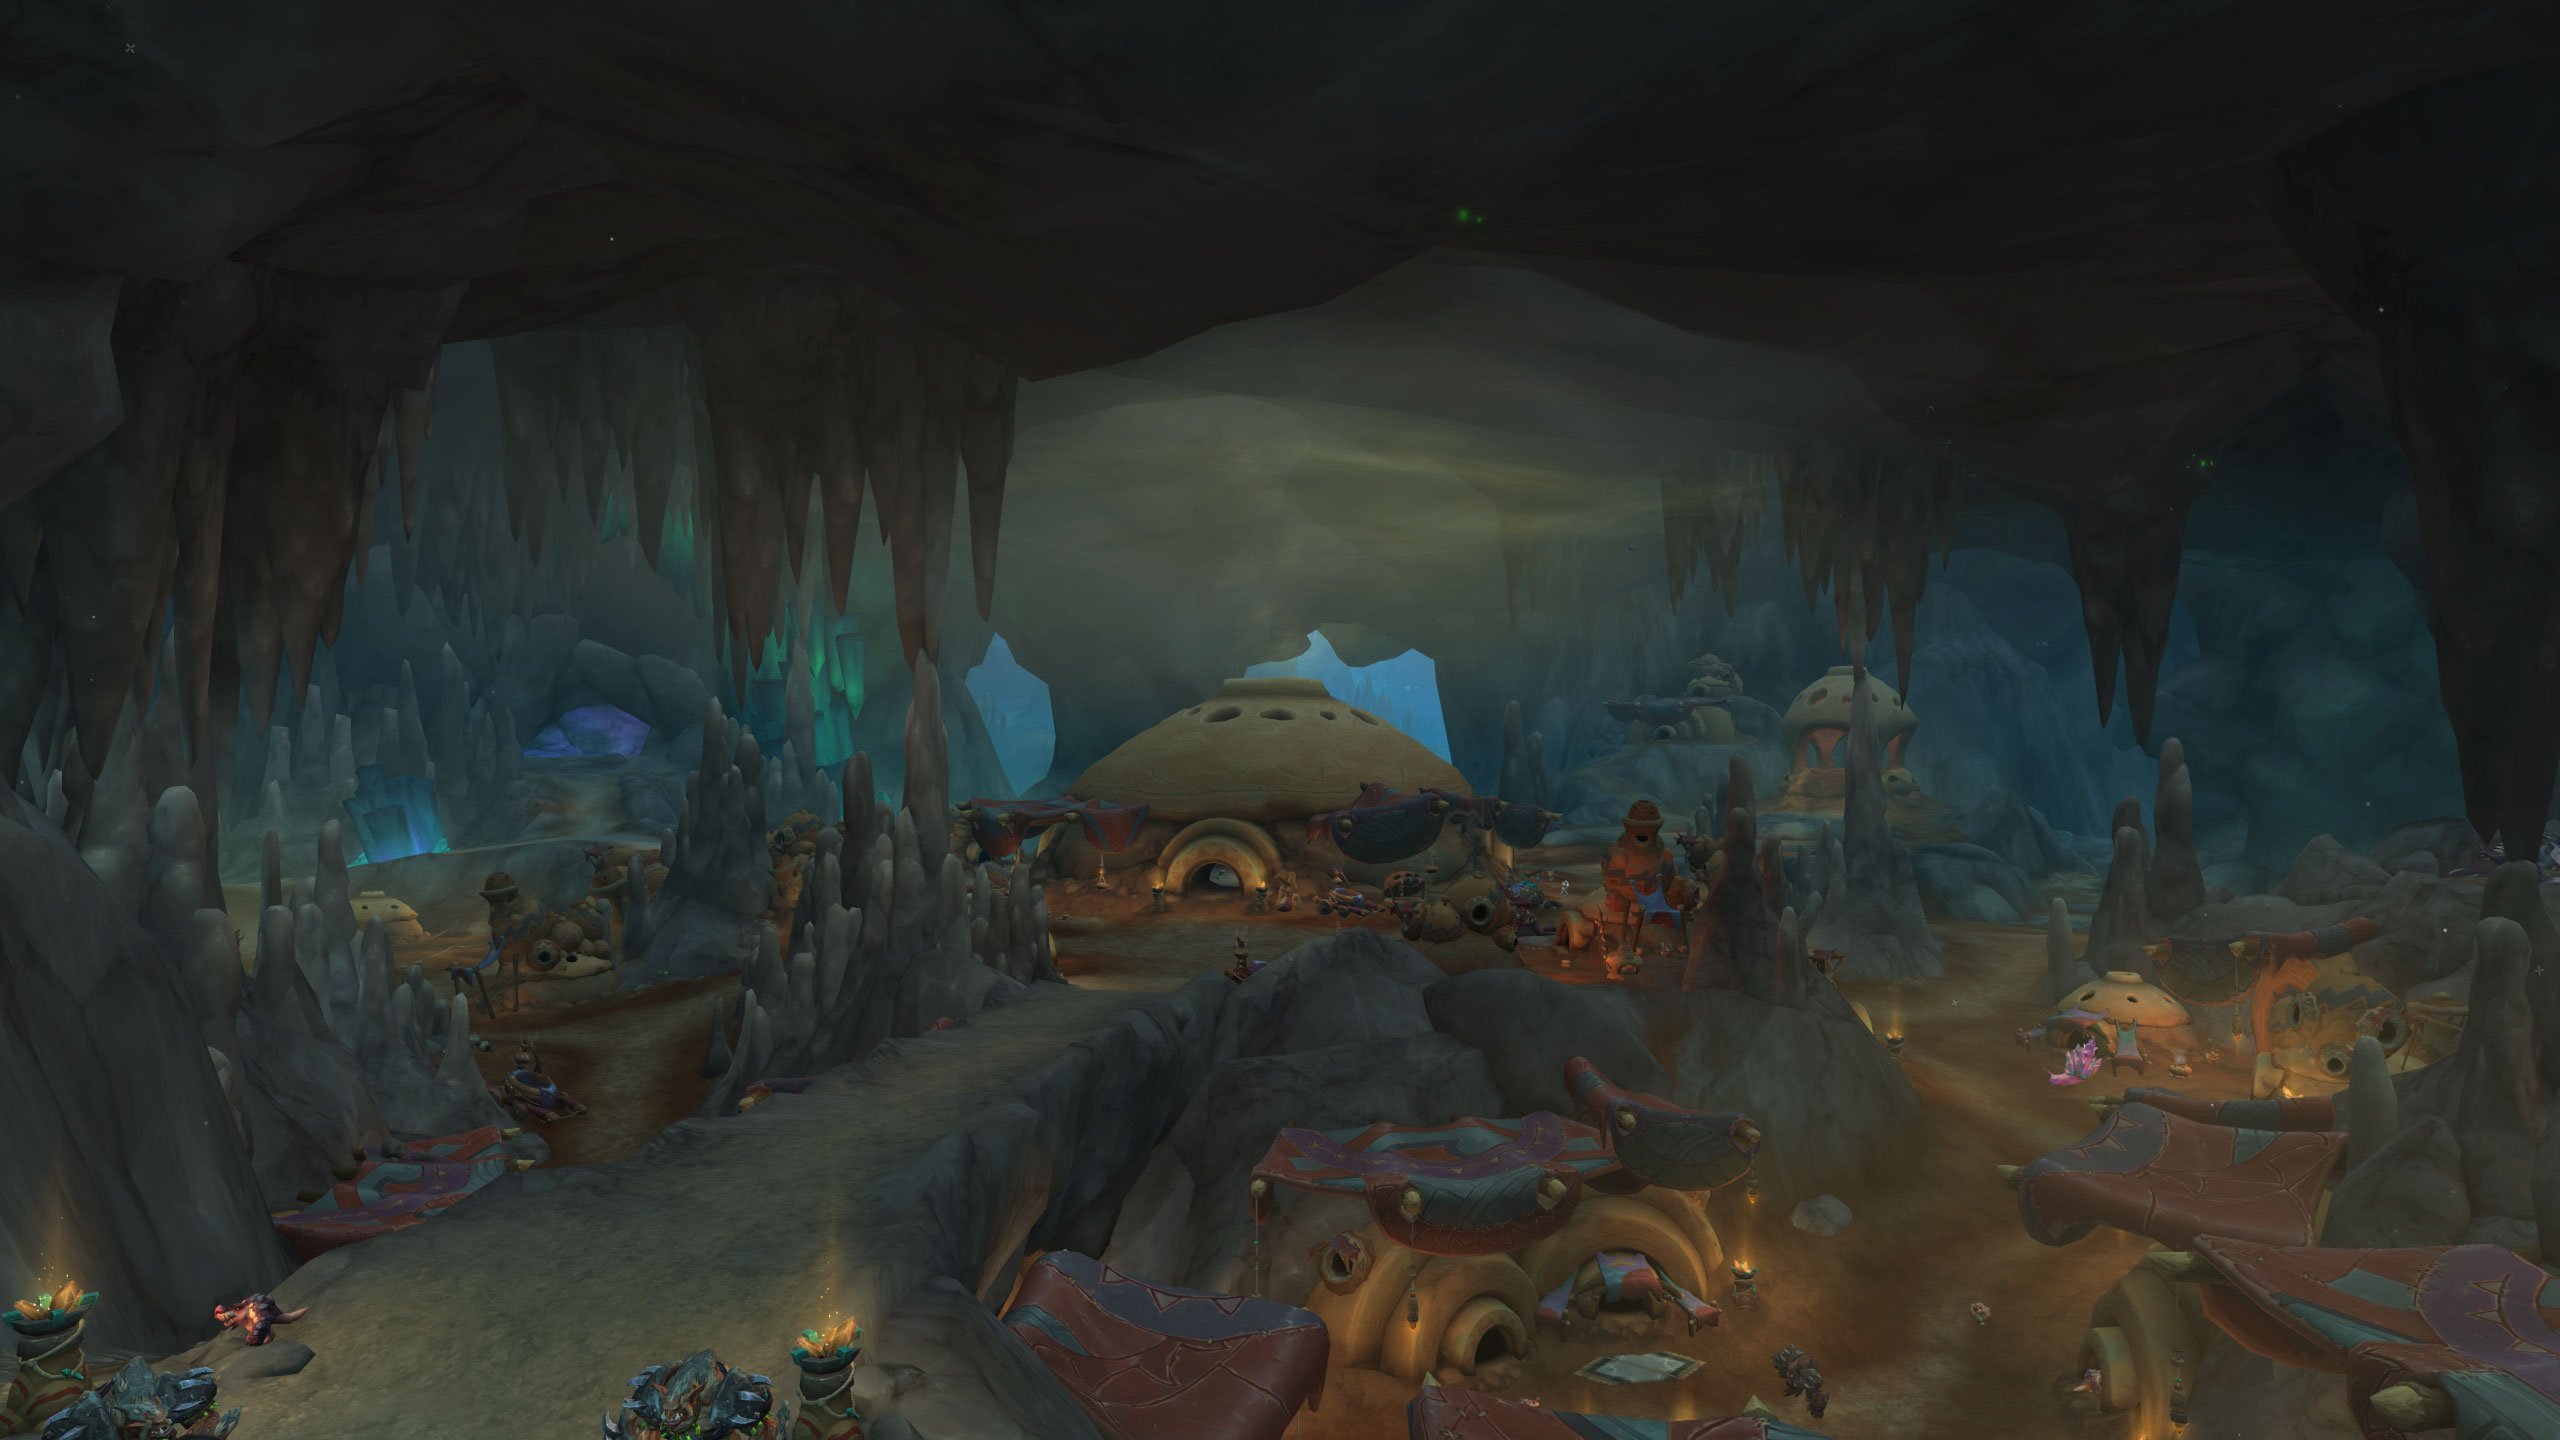
Zaralek Cavern in World Of Warcraft Dragonflight Overview and Guide

Just as Odysseus was lured by the call of the Sirens, so too might you be drawn to the enigmatic allure of Zaralek Cavern in World of Warcraft: Dragonflight. Nestled within the Dragon Isles, this maze of shadows and wonders offers a plethora of challenges and rewards that cater to adventurers of all calibers. You’ll find yourself navigating through the twists and turns of its subterranean passages, where opportunities and perils lurk behind every stalactite. Engage in the cavern’s unique activities, from deciphering ancient puzzles to battling formidable foes, and perhaps you’ll emerge with more than just the tales of your bravery. But be warned, the cavern holds secrets that are not easily relinquished; you’ll need to muster all your wits and strength to uncover what lies at its heart. Will you rise to the occasion and claim the treasures within, or will the cavern’s enigmatic depths claim you first? The choice is yours, and the path ahead is fraught with intrigue.

Importance of Zaralek Cavern

As a hub for character progression and unique rewards, Zaralek Cavern is crucial for enhancing your Dragonriding abilities and acquiring Season 2 gear in World of Warcraft Dragonflight. Nestled beneath the sprawling landscapes of the Dragon Isles, this enormous cave is steeped in the legacy of the Embers of Neltharion. The cavern’s twisting tunnels and vast chambers are lined with glimmering crystalline structures, making it a sight to behold.

You’ll find yourself drawn to the Zaralek Glowspores, a peculiar resource scattered throughout the cave. These glowspores aren’t just for show; they play a key role in some of the cavern’s unique activities. And if you’re a collector of companions, keep an eye out for the covetable battle pet that calls this underground realm home.

To fully harness the cavern’s potential, you’ll need to dig deep into the various challenges and quests it offers. As you brave the depths, you’ll unlock new Dragonriding talents by gathering Dragonriding Glyphs. These enhancements are vital for exploring the Dragon Isles with unprecedented agility and speed. So don your adventurer’s gear, and prepare to uncover the secrets of Zaralek Cavern—it’s an experience you won’t want to miss.

Accessing Zaralek Cavern

Before you can delve into the myriad activities and reap the rewards of Zaralek Cavern, you’ll need to first unlock access to this subterranean expanse in Patch 10.1. Here’s how you’ll go about it:

  • Start your journey
  • Begin by following the questline that introduces you to the Dragon Isles and naturally leads you towards Zaralek Cavern.
  • Earn the trust of the Loamm Niffen
  • As you complete quests and aid the locals, you’ll gain reputation with the Loamm Niffen faction, which is crucial for accessing certain areas of the cavern.
  • Discover flight paths
  • Unlocking flight paths within and around Zaralek Cavern will be pivotal for navigating the expanse efficiently.

Keep an eye out for special items that can enhance your exploration, such as:

  • Special items to collect
  • Look for Zaralek Sporebats and other unique collectibles scattered throughout the cavern.
  • Acquiring a snail pet from the depths might just be the quirky companion you’ve been looking for.

Navigating Entrances and Flight Masters

Having unlocked Zaralek Cavern, you’ll find its entrances scattered across the Dragon Isles, each marked by a distinctive cave icon on your map. These entry points are strategically located, ensuring that regardless of where you are on the Isles, access to the cavern isn’t too far away. Keep an eye out for these icons as you explore; they’re your gateway to the underground wonders and challenges that await.

Once inside Zaralek Cavern, you’ll want to familiarize yourself with the local Flight Masters. You’ll find three of them, each offering a quick return to the surface. They’re essential for efficient navigation, especially after a long session of delving into the cavern’s depths. To locate these Flight Masters, open your Flight Map—a valuable tool that displays all available flight paths. It’s handy for planning your route back to the surface or to a different part of the Isles.

Activities and Reward Opportunities

Dive into the heart of Zaralek Cavern where you’ll find a treasure trove of activities and rewards to earn, from Snail Racing to battling rare creatures. You’re not just spelunking for the sake of it; there’s a plethora of content waiting for you to uncover, each with its own set of alluring prizes. Get ready to fill your bags and boost your character’s power and prestige.

Here’s a quick rundown of what you can expect:

  • Dynamic Events and Challenges
  • Participate in unique World Quests tailored to the cavern’s ecosystem.
  • Engage in weekly events like Researchers Under Fire for special rewards.
  • Test your speed and cunning in Snail Racing competitions.
  • Notable Rare Creatures
  • Hunt and defeat over two dozen rare mobs scattered throughout the cavern.
  • Each rare provides not only a satisfying challenge but also drops coveted gear and items.
  • Exclusive Collectibles
  • Accumulate Unearthed Fragrant Coins to spend on gear enhancements.
  • Exchange coins for Coveted Baubles, which can be traded for exclusive cosmetics.
  • Keep an eye out for hidden treasures that can bolster your collection of mounts and pets.

Collecting Fragrant Coins and Baubles

As you explore Zaralek Cavern, you’ll come across Unearthed Fragrant Coins, the currency integral to purchasing gear upgrades and coveted cosmetic items. These coins are scattered throughout the cavern and you’ll need to keep an eye out for them as you venture through various activities and challenges.

To help you understand what you can snag with these Fragrant Coins and Baubles, here’s a handy table:

Unearthed Fragrant CoinsCoveted Baubles
Whelplings Bountiful Chest (15 coins)Diamondshell (50 baubles)
Drakes Small Chest (5 coins)Various Mounts (Varied costs)
Drakes Hefty Chest (10 coins)Battle Pets (Varied costs)
Spinsoa’s Gear Upgrades (Varied costs)Cosmetic Items (1 bauble and up)
Convert Coins to Baubles (1:1 Ratio)Saccratros’s Exclusive Cosmetics

Frequently Asked Questions

Can I Access Zaralek Cavern Without Having a Dragonriding Mount, and How Does It Affect My Gameplay Experience There?

You can’t access Zaralek Cavern without a dragonriding mount, which limits your ability to participate in activities and earn rewards that are crucial for enhancing your gameplay experience in that area.

Are There Any Specific Class or Role Advantages for Tackling the Challenges Within Zaralek Cavern?

Sure, your class might seem perfect for any challenge, but in Zaralek Cavern, everyone’s equally baffled! No specific class holds an edge; it’s all about skill, teamwork, and a bit of luck.

How Does Group Play Factor Into the Zaralek Cavern Experience, and Are There Any Mechanics That Encourage or Require Teaming up With Other Players?

You’ll find group play essential, as some mechanics need teamwork. Teaming up enhances the experience and is necessary for tackling certain challenges that solo players can’t handle alone.

Are There Any Hidden Secrets or Easter Eggs Within Zaralek Cavern That Aren’t Tied to the Main Objectives or Rewards?

You’ll find hidden gems and easter eggs scattered about, not directly linked to your main quests or rewards. Keep an eye out; exploration often pays off with unique finds and surprises.

After Completing the Embers of Neltharion Campaign, Are There Any Recurring or Daily Activities Exclusive to Zaralek Cavern That Players Can Engage in for Continued Progression?

Post-campaign, you’ll delve into daily activities like Sniffenseeking and Snail Racing, and tackle weekly events for progression and rewards, without needing prior knowledge of Zaralek’s ins and outs. Keep at it!

Visit the blog to learn about the latest news in the world of Azeroth.

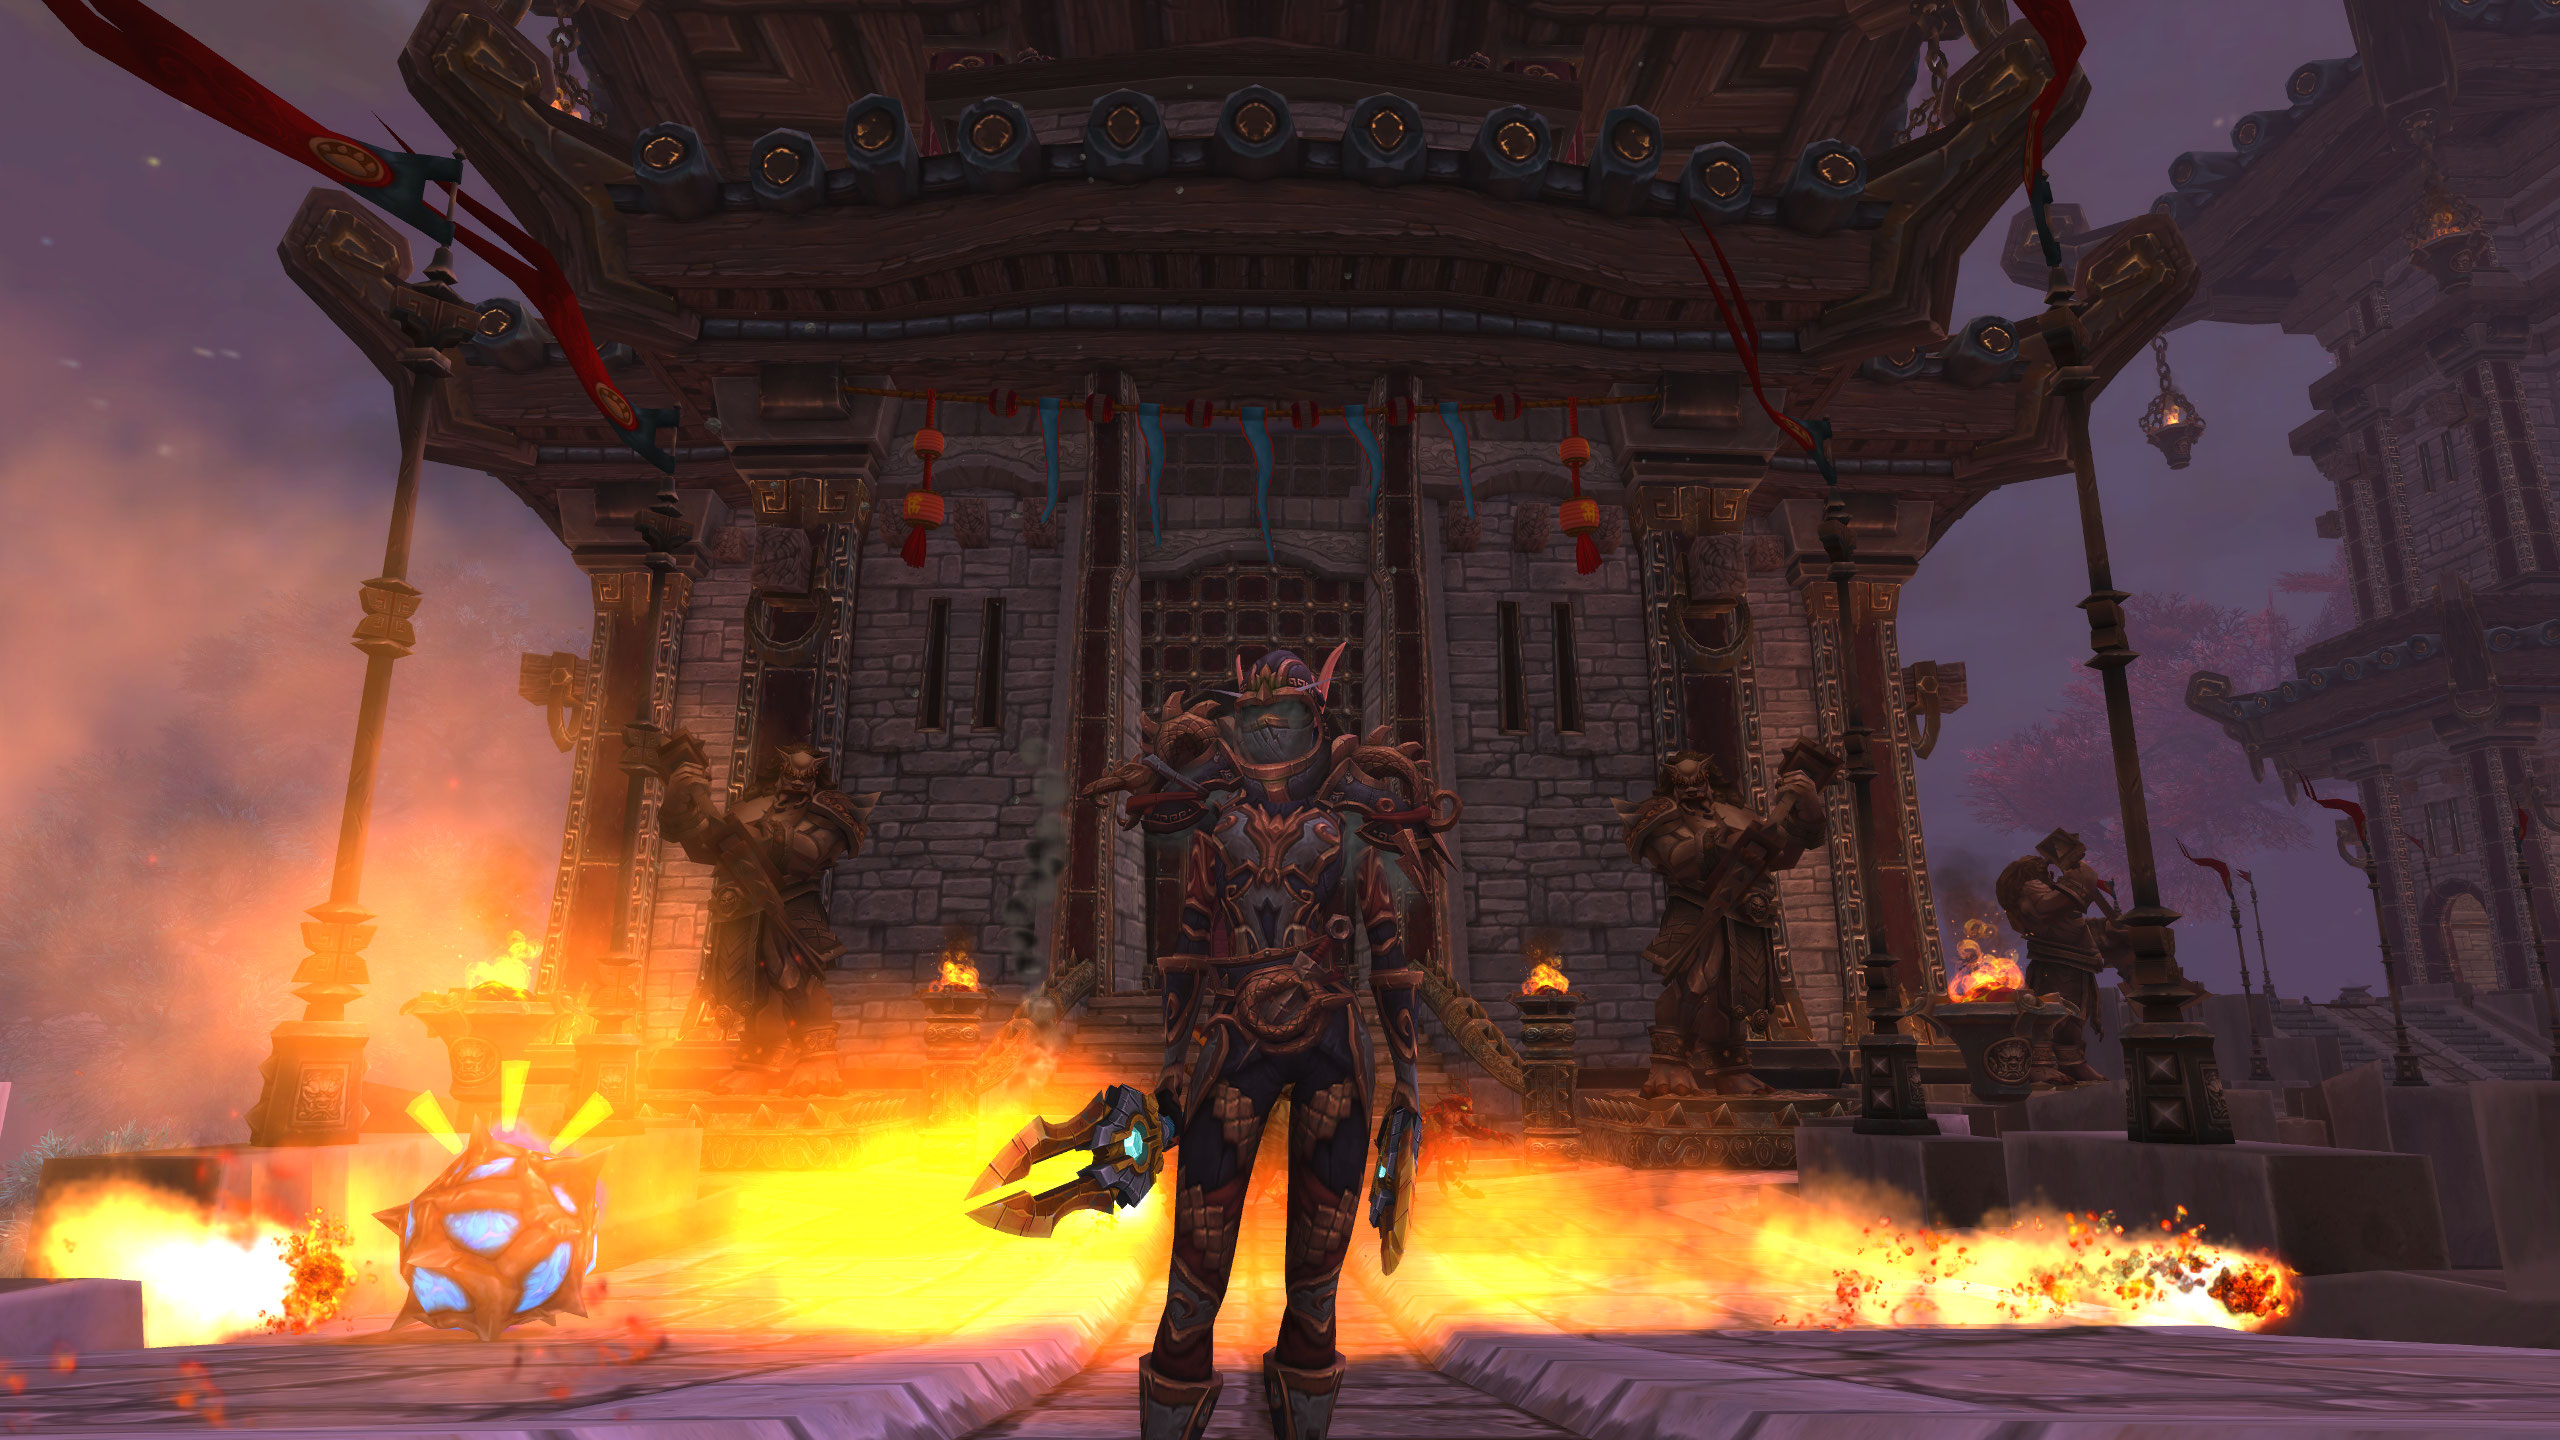
Challenge Mode From Pandaria! Achivement Guide in World Of Warcraft

As you stand on the precipice of legend and lore, peering into the depths of World of Warcraft’s Pandaria Challenge Modes, remember that even the mightiest rivers start as a mere trickle. You’ve come this far, and now it’s time to prove your mettle in a trial that separates the wheat from the chaff. Challenge Modes aren’t just a test of strength; they’re a symphony of strategy, skill, and coordination, where every second shaved from the clock and every move executed with precision brings you closer to the hallmarks of a true champion. As you tighten your grip on your weapon of choice, consider this: within these hallowed virtual grounds, the path to glory is fraught with perils that will demand every ounce of your expertise. Will you emerge victorious, basking in the envy-inducing radiance of achievements and rewards, or will you be just another footnote in the pages of Azeroth’s history? Stay sharp, for in the next moments, we’ll embark on a journey to ensure your name is etched among the stars.

Understanding Challenge Modes

Challenge Modes in World of Warcraft are timed dungeon runs where you’ll be tested on your speed, strategy, and team coordination. You’re thrown into a race against the clock, pushing through dungeons at heroic difficulty with the aim of achieving the highest possible rating. To excel in these challenge modes, you’re going to need a solid team that works well together, as every second counts.

Scoring a rating of gold isn’t just about bragging rights; it’s a testament to your mastery of the game’s mechanics. Achieving gold in each dungeon unlocks exclusive rewards such as unique class armor sets that are not just visually stunning but also serve as a mark of your skill and dedication to challenge content.

These armor sets are more than just gear; they’re trophies, signifying your ability to conquer the toughest of challenges. But remember, challenge modes aren’t just about the gold achievement. They’re about pushing your limits and honing your skills in a competitive environment. So gear up, strategize, and dive into the fray. The clock’s ticking, and glory awaits those who can rise to the challenge.

Preparing for the Dungeons

Before setting foot in the dungeons, you’ll need to meticulously prepare your gear and assemble a well-coordinated team. This isn’t just a stroll through the Darkmoon Faire; it’s a challenge of patience, skill, and coordination. You’ll want to pore over every blue post and forum thread you can find for tips and strategies specific to each dungeon. The right combination of classes and responsibilities can make or break your run.

Remember, in these challenge activities, your usual raiding or PvP gear won’t cut it. Instead, your equipment is scaled down to ensure that the playing field is level and that it’s your group’s strategy and execution that determine your success. So, you’ll need to optimize your gear for the most beneficial stats rather than simply the highest item level.

Don’t forget to look for hidden achievements that could give your team an edge. Some of these may offer shortcuts, bonuses, or other advantages that could shave precious seconds off your time. Keep an eye out, communicate with your team, and plan meticulously. With the right preparation, you’ll conquer the dungeons and earn those bragging rights.

Achievements Breakdown

Diving into the specifics, let’s break down the achievements you’ll be gunning for in World of Warcraft’s Challenge Mode dungeons. These timed runs are not just about bragging rights; they’re also about the sweet, sweet achievements that come with them. You’re in for a treat, as each dungeon offers a unique set of challenges that’ll test your mettle and your group’s coordination.

Here’s what you should keep an eye out for:

  • Challenge Conqueror: Bronze – This is where you’ll start. You need to complete each Challenge Mode dungeon with a bronze rating or better. It’s a solid entry point that’ll get your feet wet.
  • Challenge Conqueror: Silver – Once you’ve got the hang of things, aim for silver. It’s tougher, but it’s also where the rewards start to get shinier, including a shiny new title!
  • Challenge Conqueror: Gold – For the pinnacle of Challenge Mode glory, gold is where it’s at. Not only will you earn the ultimate achievement, but you’ll also unlock some exclusive transmog gear that’ll make your character stand out in a crowd.

Strategy and Tips

To conquer Challenge Mode dungeons in World of Warcraft, you’ll need a solid strategy coupled with practical tips to guide your team to victory. It’s not just about having the best gear or the highest damage output; it’s about teamwork, knowing the mechanics, and executing your plan flawlessly.

Remember, each dungeon is a race against the clock, where every second counts. You’ll need to balance speed with precision, ensuring you’re not just rushing but also effectively managing each encounter. Below is a table that encapsulates the essence of what you’ll face and the emotions tied to overcoming these challenges:

Dungeon ChallengesEmotional Rewards
Mastering mechanicsTriumph
Coordinating cooldownsCamaraderie
Adapting to the unexpectedAdrenaline rush
Achieving Gold timesElation

You’ll feel a rush of adrenaline as you adapt to the unexpected, and nothing beats the elation of achieving those Gold times. Embrace the camaraderie that comes from coordinating your team’s cooldowns and abilities. And when you finally master the mechanics of each boss and trash pack, the sense of triumph will be unmatched. Stick to the plan, support each other, and those achievements will be yours for the taking.

Earning Gold Medals

Securing Gold medals in Challenge Mode dungeons requires you to not only be fast but also exceptionally strategic with every move you make. Every second counts, and there’s no room for hesitation. Here’s what you’ve got to keep in mind:

  • Know Your Route: You’ve got to map out the most efficient path through the dungeon. Wasting time on unnecessary fights or getting lost isn’t an option. Study the layout and know where you’re headed.
  • Optimize Your Gear and Talents: Every piece of gear, every talent choice should be tailored to maximize your damage, healing, or survivability. Don’t just go with what works outside of Challenge Mode—adapt to what’s best for these specific trials.
  • Coordinate with Your Team: Communication is key. You need to be in sync with your group, calling out when to use crowd control, when to pop cooldowns, and when to skip mobs. Each member needs to know their role and perform it flawlessly.

Frequently Asked Questions

What Are the Unique Rewards for Completing All of the Challenge Mode Dungeons in Mists of Pandaria, and Are They Still Obtainable in the Current Version of World of Warcraft?

You can’t obtain the unique Challenge Mode rewards from Mists of Pandaria anymore; they were exclusive to that expansion and removed once Warlords of Draenor was released.

How Can Players Access the Challenge Mode Dungeons if They Didn’t Play During the Mists of Pandaria Expansion?

Imagine stepping through time; you can’t access Mists of Pandaria Challenge Modes anymore. They were exclusive to that expansion and are no longer available, even if you missed them back then.

Can Challenge Mode Achievements From Mists of Pandaria Be Completed in a Group With Higher-Level Characters, and How Does Level Scaling Affect the Difficulty?

You can’t complete old Challenge Mode achievements; they were exclusive to Mists of Pandaria and aren’t affected by level scaling or available for higher-level characters now. They’re legacy achievements and no longer obtainable.

Are There Any Community Resources or Forums Where Players Can Find Dedicated Groups Specifically for Attempting to Complete Pandaria Challenge Modes?

You’ll find dedicated groups on community platforms like Reddit’s /r/wow or the official WoW forums. They’re teeming with players aiming for those same achievements, so jump in and team up!

What Happens to a Player’s Challenge Mode Progress if They Have to Replace a Group Member Partway Through the Dungeon Run?

If you replace a group member mid-run, your progress continues, but the new member won’t get credit for earlier completed objectives and you’ll all need to adapt quickly to maintain your challenge mode pace.

Conclusion

You’ve powered through the mechanics, honed your strategies, and now Pandaria’s Challenge Modes are within your grasp. Remember that guild from Stormreaver that snagged all Golds with seconds to spare? That could be you, etching your team’s name in WoW history. Keep pushing the limits, refine those runs, and those achievements will be yours. Now go out there and show Azeroth what you’re made of—it’s your time to shine!

Visit the blog to learn about the latest news in the world of Azeroth.

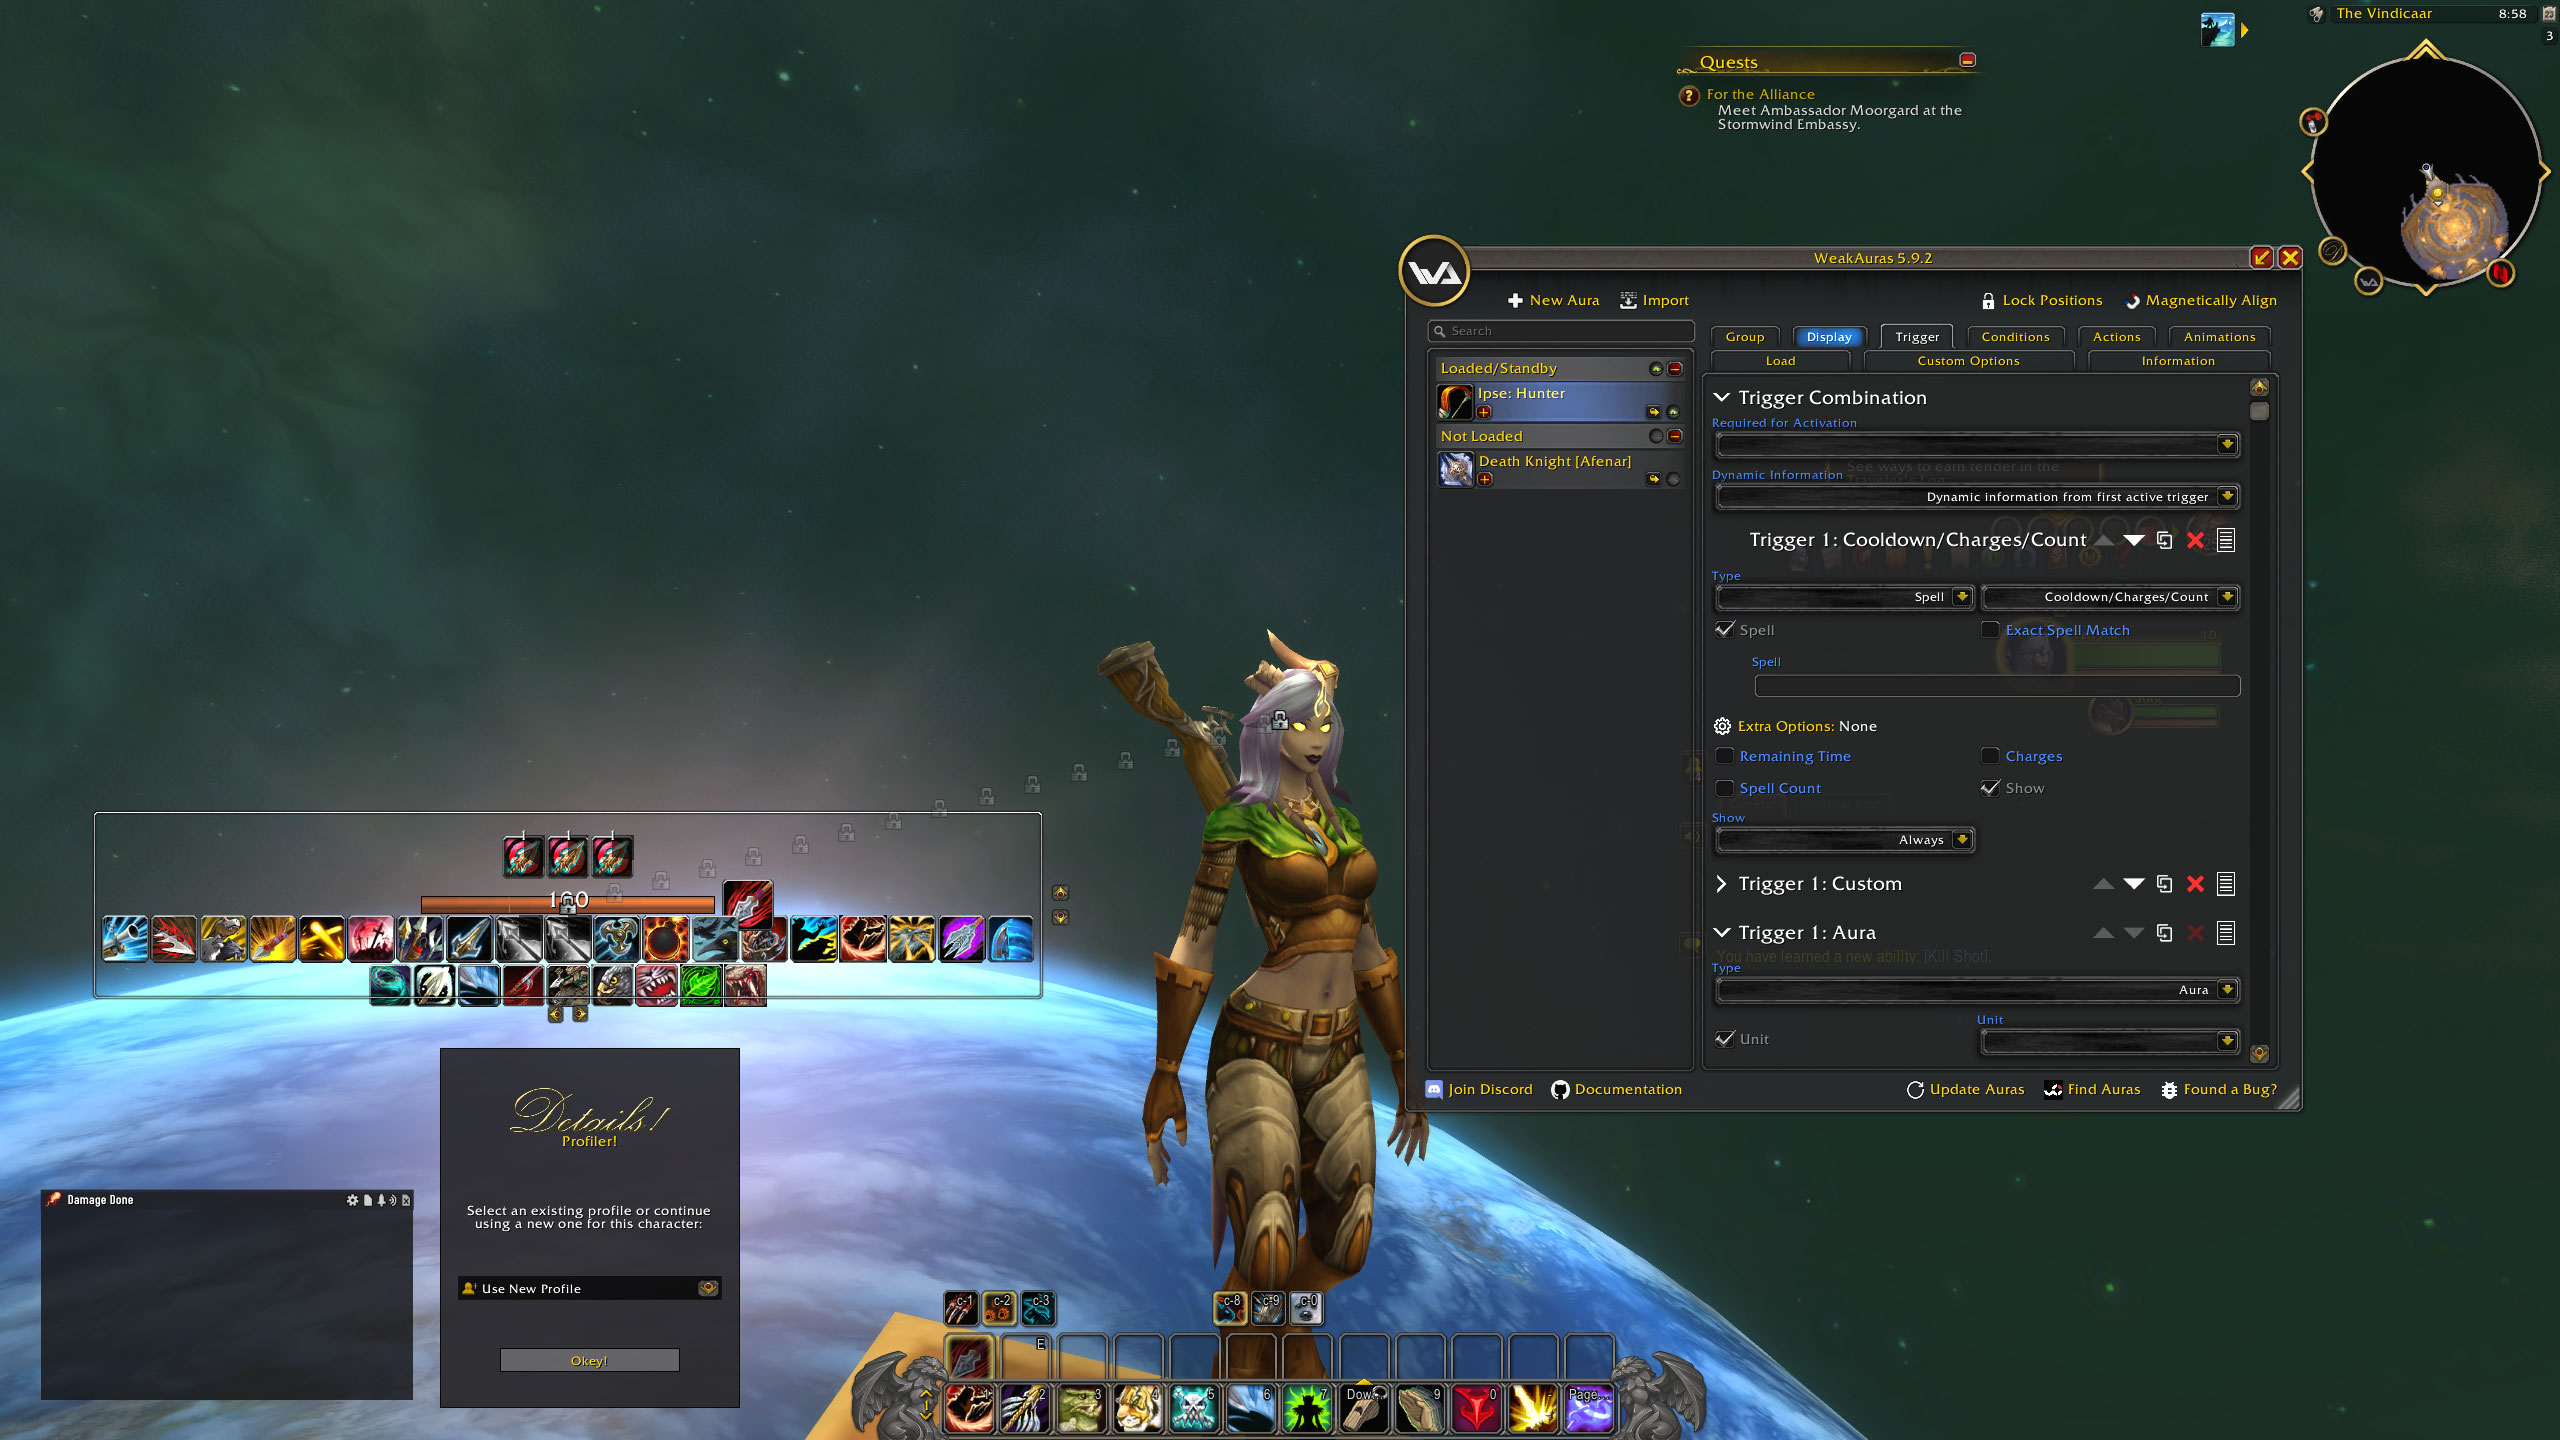
Interface Expansions in One Good AddOn .WeakAuras Guide in WoW

As the dusky horizon of Duskwood fades into the backdrop of your screen, you can’t help but feel that the default World of Warcraft interface lacks a certain personal touch that you’re craving. That’s where WeakAuras comes into play, an add-on that promises to revolutionize your in-game experience. You’ll find that it’s not just about aesthetics; it’s about functionality, efficiency, and the sheer joy of having an interface that responds to your every command with the precision of a well-oiled machine. In this guide, you’ll learn how to harness the full potential of WeakAuras, from the rudimentary steps of installation to the advanced intricacies of custom triggers and dynamic displays. It’s time to elevate your game, and as you stand on the brink of this interface expansion, remember that mastery awaits those who are willing to explore the depths of what WeakAuras can offer.

Understanding WeakAuras Basics

Diving into WeakAuras, you’ll find it’s a powerful tool in WoW that allows you to create custom displays to track various game mechanics. It’s all about personal preference when it comes to how you choose to enhance your user interface. You’re not stuck with the default interface elements; WeakAuras gives you the freedom to tailor everything to your liking.

A key feature of WeakAuras is its ability to let you create and manage custom textures, which can include anything from cool-down icons to health bars. You can position these elements anywhere on your screen, ensuring that the information you need is always where you want it. This can be a game-changer, especially during intense gameplay where every second counts.

Navigating through WeakAuras is made easy with its options menus. You’ve got a search bar to quickly locate specific auras or settings, saving you time when you need to make on-the-fly adjustments. Plus, with a plethora of settings available, you can adjust the opacity, size, and even animations of your auras. It’s this level of customization that makes WeakAuras an indispensable part of your WoW experience.

Customizing Your Interface

Having grasped the basics of WeakAuras, it’s now time to focus on how you can customize your interface to suit your gameplay style perfectly. Whether you’re a seasoned raider or a casual quester, your interface should reflect your needs. Let’s dive into how you can tailor your experience for maximum efficiency and enjoyment.

Considering the real estate on your screen, a nameplate addon can be a game-changer. It’ll help you keep track of enemies and allies with ease, especially in the thick of battle. But don’t stop there; integrate WeakAuras to create a complex addon ecosystem that works cohesively. You can adjust the transparency of certain elements, or even set up green arrows to indicate important directional cues during encounters.

Don’t overlook your chat bar, either. It’s crucial for communication, and with WeakAuras, you can set up alerts or highlight messages from specific players. This personalization means you’ll never miss an important call-out again.

Essential WeakAuras for Gameplay

To maximize your performance in WoW, it’s essential to incorporate some specific WeakAuras that align with your gameplay objectives and class requirements. These user-created tools can be a game-changer, enhancing how you interact with the game’s mechanics and giving you a competitive edge. Here’s a rundown of some indispensable WeakAuras to consider:

  1. Cooldown Tracking: Stay on top of your game by using WeakAuras to track the cooldowns of critical abilities. This ensures you’ll never miss the perfect moment to unleash your most powerful attacks.
  2. Resource Management: For classes that manage resources like mana, energy, or combo points, WeakAuras can provide clear visuals to help you optimize your resource usage.
  3. Buff/Debuff Alerts: With WeakAuras, you can set up alerts for important buffs or debuffs, making it easier to react promptly, whether it’s to refresh a beneficial spell or to mitigate a dangerous status effect.
  4. Encounter-Specific Mechanics: Customize WeakAuras for specific boss mechanics in raids or dungeons. Timely reminders or warnings for certain boss abilities can be the difference between victory and a wipe.

Incorporating these essential WeakAuras into your gameplay will undoubtedly give you a leg up on whatever challenges Azeroth throws at you.

Advanced Configuration Tips

After mastering the essentials of WeakAuras for your gameplay, it’s time you learned how to fine-tune these tools for even greater control and personalization. Moving into advanced configurations, you’ll be tweaking more intricate settings to make your interface truly your own.

Start by exploring the ‘Custom Options’ tab within a specific aura. Here, you can create custom triggers and responses. For instance, you might want an aura to activate only when you’re under a certain health percentage or when a specific buff is active. Dive into the ‘Custom Trigger’ function and write a bit of Lua code to set these conditions.

Next, consider the ‘Animations’ tab. It lets you add dynamic visual effects to your auras. You don’t need to stick to the basics; experiment with start, main, and finish animations to give your UI a more dynamic feel. Adjust the speed, duration, and type of animation to match the intensity of your gameplay.

Lastly, don’t overlook the power of ‘Dynamic Group’ settings. This allows you to group multiple auras together and control them as a unit. Positioning, sorting by remaining duration, and even spreading auras out based on their priority are all possible, ensuring you have the information you need, right when you need it.

Troubleshooting Common Issues

Despite your best efforts, you might encounter some hiccups with WeakAuras; let’s tackle common issues to get your setup back on track. When you’re knee-deep in the intricacies of this powerful addon, a few snags are inevitable. Here’s a quick list to guide you through smoothing out the common wrinkles:

  1. Auras Not Displaying: Make sure the load conditions are set correctly. If an aura is tailored for a specific class, spec, or combat state, double-check those settings. Sometimes, it’s as simple as being in the right place or situation for the aura to trigger.
  2. Performance Issues: WeakAuras can be resource-intensive. If your framerate dips, consider disabling auras not essential for your current activity. Additionally, review the update rates of your auras; higher rates can cause more lag.
  3. Missing Imports: If you’ve got a code from a friend or online and it’s not working, make sure you’ve copied the entire string. Partial strings won’t import and can lead to errors.
  4. Curse of the Disappearing Cursors: A specific issue like a missing cursor weakaura might need a more targeted fix. Check for updates or conflicts with other addons that might be causing the issue.

Frequently Asked Questions

How Can I Share My Custom Weakauras Configurations With Friends or the Wow Community?

You can share your custom WeakAuras by exporting the string from the addon, then sending it to friends or posting it online for the WoW community to import into their own interface.

Are There Any Security Risks Associated With Using Weakauras, Such as Malicious Scripts or Data Breaches?

Yes, there’s a risk with WeakAuras; if you import scripts from untrusted sources, they could contain malicious code. Always verify the source and be wary of any scripts that request your personal information.

Can Weakauras Be Used to Replicate the Functionality of Other Popular Add-Ons, and if So, How Does the Performance Compare?

You can absolutely mimic other add-ons with WeakAuras, turning your interface into a powerhouse. However, performance may vary—sometimes it’s smoother, other times it might lag behind the specialized functionality of dedicated add-ons.

How Does the Use of Weakauras Impact the Game’s Performance on Lower-End Systems, and What Are the Best Practices for Optimization?

You’ll find that using WeakAuras can affect game performance on lower-end systems. To optimize, keep your auras simple, limit the number used, and update them regularly for the best balance between utility and efficiency.

What Are the Legal Considerations of Using Weakauras in World of Warcraft, Especially in the Context of Competitive Play and Tournaments?

You’ll want to ensure using WeakAuras doesn’t break Blizzard’s Terms of Service, especially in tournaments, where they might have additional rules. Stay updated on policies to avoid any legal issues.

Visit the blog to learn about the latest news in the world of Azeroth.

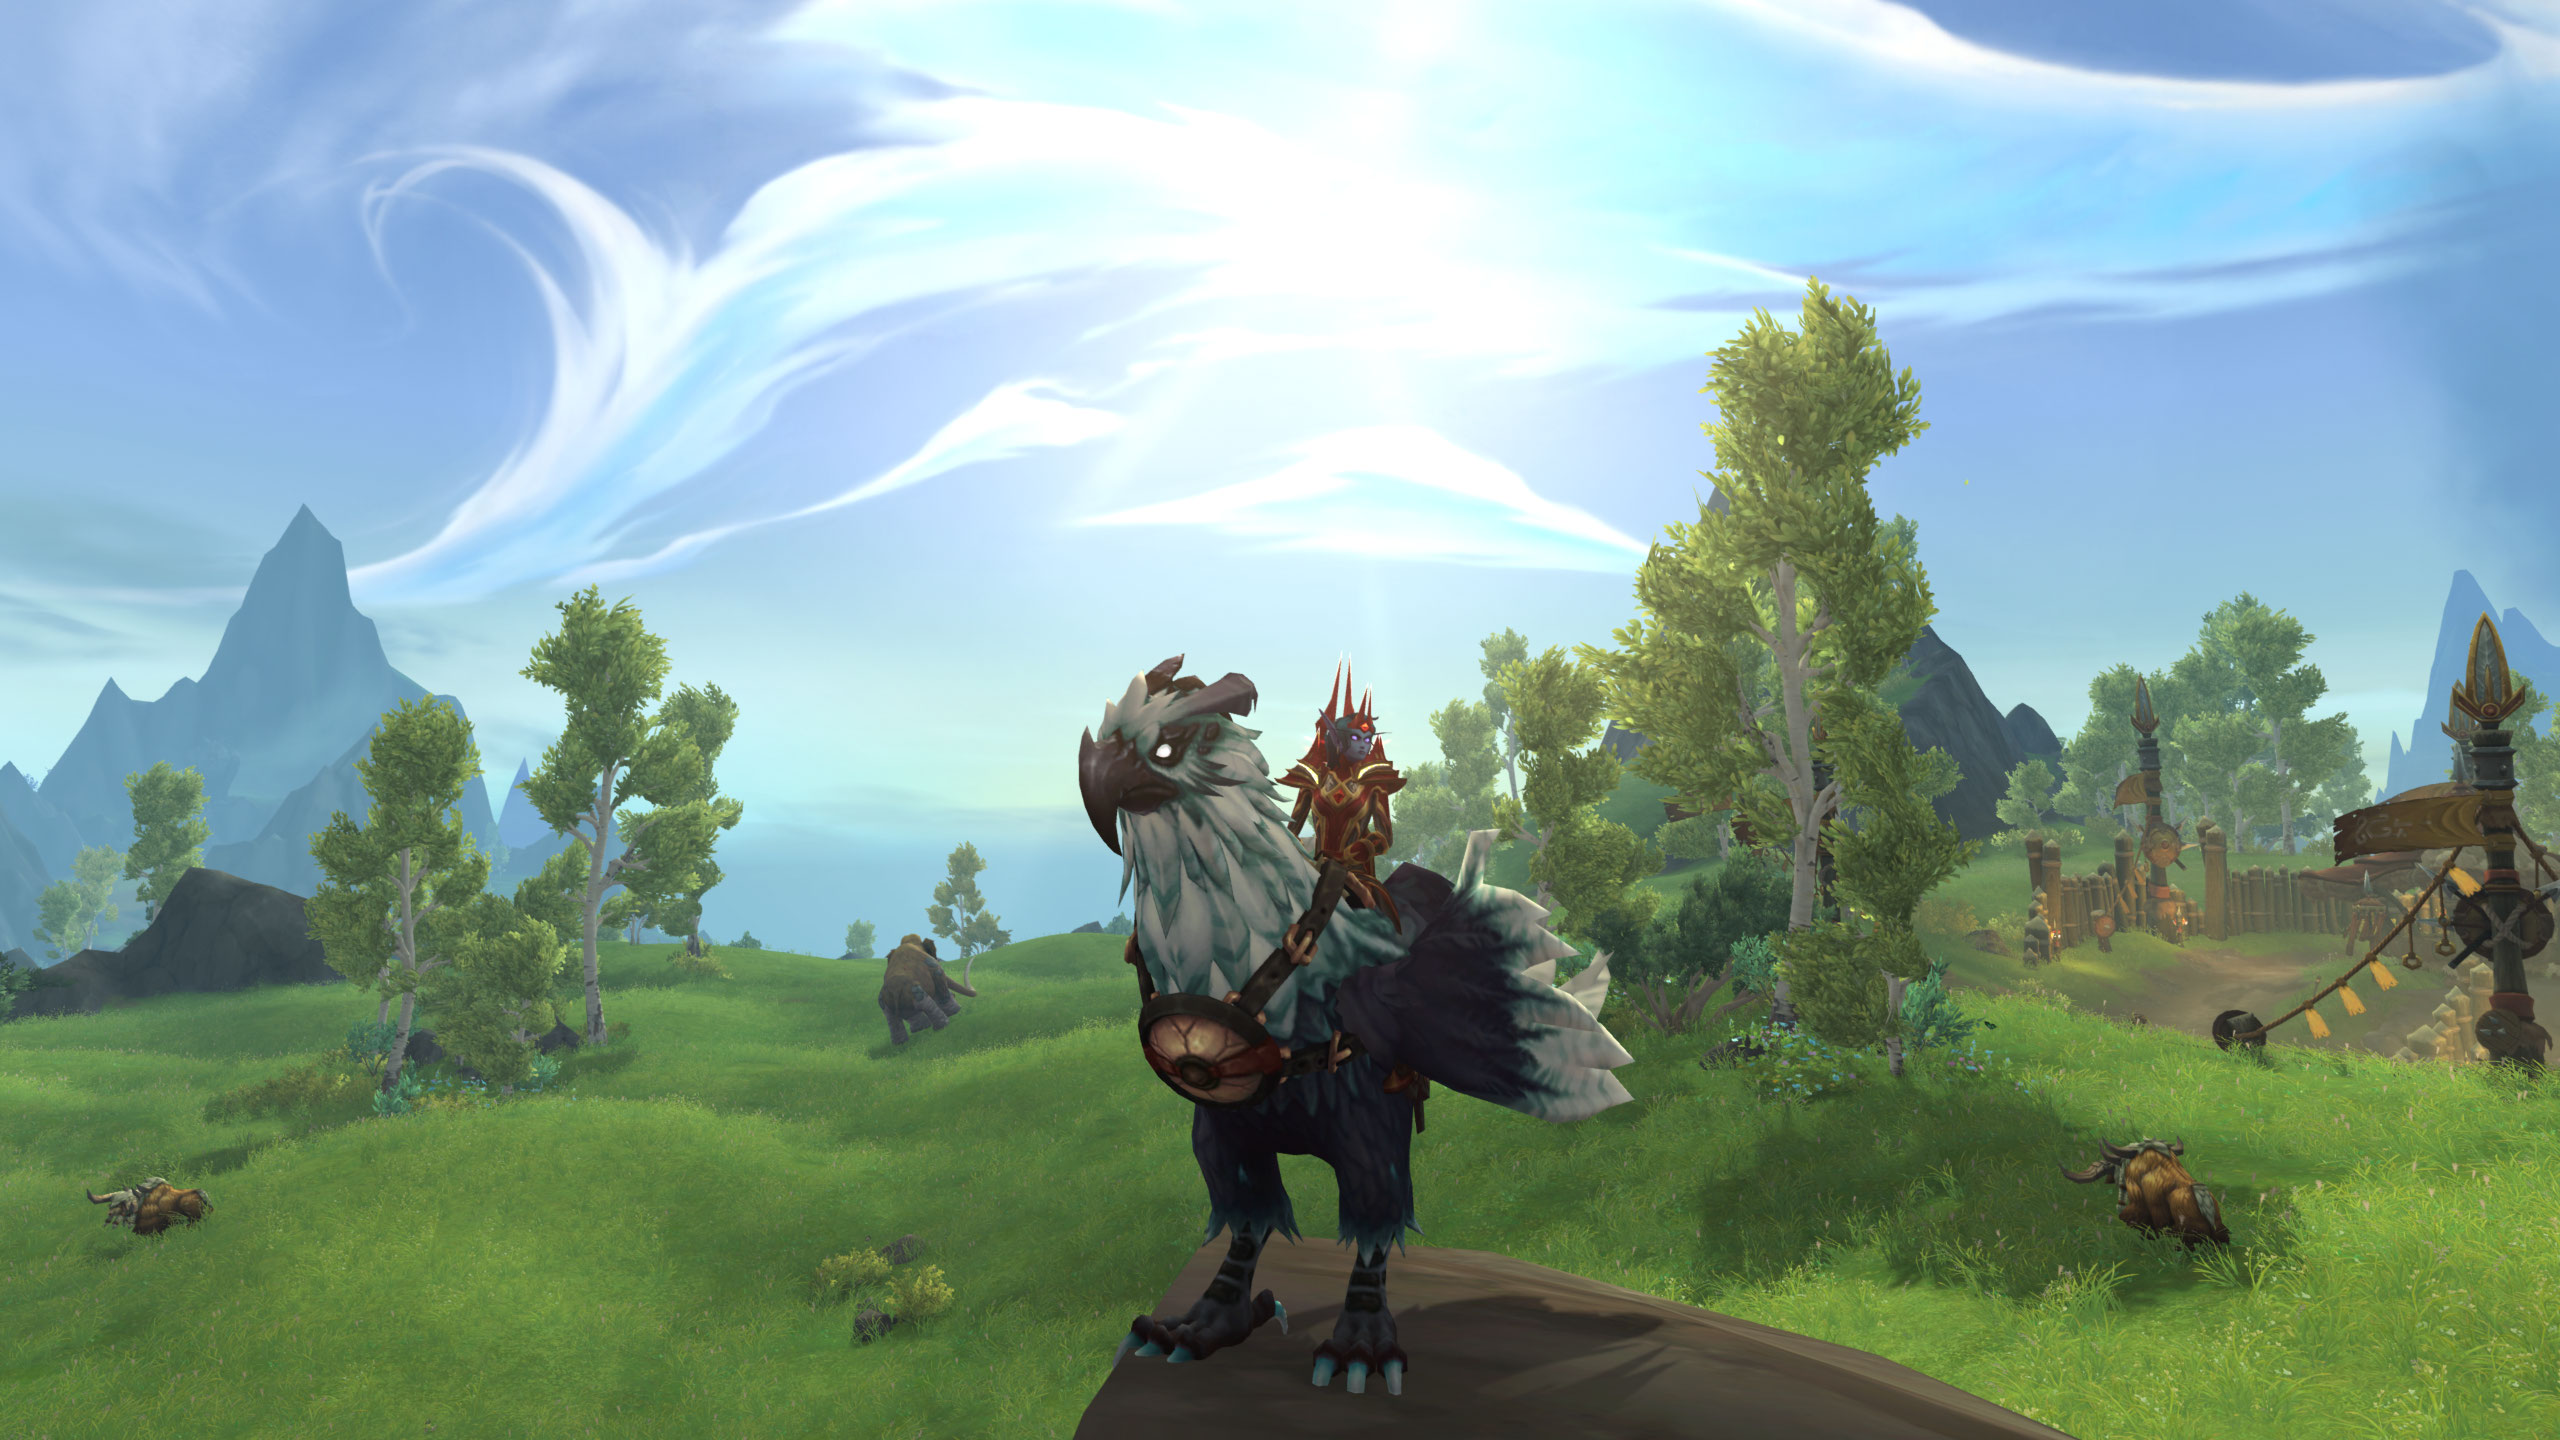
Top 10 Dragonflight Mounts: A WoW Guide

As you saddle up for a journey through Azeroth’s skies, the trusty steed of a bygone era won’t suffice; today’s dragonflight mounts are marvels of both beauty and functionality.

You’re not just a player in the World of Warcraft; you’re a collector of its most prestigious treasures, and the mounts you choose to display are a testament to your achievements and adventures.

It’s essential to know which drakes will not only turn heads in Orgrimmar or Stormwind but will also serve you faithfully as you navigate the ever-expanding horizons of the game.

From the sleek lines of the Ascendant’s Aquilonian Trust to the elusive prestige of the Corridor Creeper’s Rarity, each mount in this top ten list holds a unique place in the pantheon of the skies.

But how do you distinguish the truly exceptional from the merely impressive? Stay with me as I guide you through the crème de la crème of dragonflight mounts, where the next page reveals not only their aesthetic allure but also the secrets to acquiring these coveted companions.

Ascendant’s Aquilonian Trust

Embarking on the quest for the Ascendant’s Aquilonian Trust, you’ll soar through the skies of the Dragon Isles atop this majestic mount, a symbol of your unwavering dedication and alliance with the Ascendant Order. This dragonriding mount isn’t just another collectible to add to your trove—it’s a testament to your mastery of the skies, a single mount that stands out even among the most impressive current mounts.

As you delve into the challenges that await in the new zones, mastering the art of dragonriding becomes crucial. The Ascendant’s Aquilonian Trust isn’t handed to you on a silver platter; it’s earned. You’ll need to demonstrate your skills and prove your worth to the Ascendant Order through a series of quests and trials. Your efforts won’t go unnoticed as you unlock this sleek, powerful dragon, a true embodiment of the bond between rider and mount.

Once obtained, the Ascendant’s Aquilonian Trust will be the envy of fellow adventurers. With its unique design and superior flight capabilities, you’ll navigate the Dragon Isles with unmatched speed and grace. Revel in the thrill of gliding over treacherous terrain and through towering spires, all while knowing you’re part of an elite group that holds the reins to this extraordinary dragonriding mount.

Timewalker’s Infinite Drakes

Delve into the annals of time with the Timewalker’s Infinite Drakes, a prestigious reward that marks your mastery over Azeroth’s temporal mysteries. Unlike the ethereal Emerald Dream mounts, these drakes are a tangible testament to your dedication, weaving through the very fabric of time itself as you ride.

As you embark on your journey to earn this exquisite mount, you’ll find yourself completing a plethora of daily quests, each one bringing you closer to the Timewalker’s Infinite Drakes. Picture the enigmatic Zenet Avis, guiding you through the complexities of time, rewarding your perseverance with knowledge and the keys to these timeless beasts.

Imagine the brown scouting ottuk and the vicious moonbeast as mere stepping stones in your quest for the ultimate prize. While these creatures are impressive in their own right, they pale in comparison to the grandeur and prestige of the Infinite Drakes.

Glacial Tidestorm Mastery

Harness the icy fury of the Glacial Tidestorm as you prove your mettle against Jaina Proudmoore in the Battle of Dazar’alor, a challenge that rewards only the most skilled adventurers with this majestic mount. Unlike many PvP mounts that require you to assert dominance in player-versus-player combat, the Glacial Tidestorm demands excellence in PvE, requiring you to defeat one of the most iconic mages in Azeroth on Mythic difficulty.

Once you’ve tamed this elemental force, you’re not just getting a mount; you’re adding an adorable mount with a unique aesthetic to your collection. While it may not have the myriad customization options of some newer Dragonflight mounts, its distinctive swirling water and ice effects make it a standout in any setting. Its rarity and the prestige of the accomplishment make it an enviable addition to your stable.

Corridor Creeper’s Rarity

The Corridor Creeper stands as a testament to perseverance in the twisting corridors of Torghast, its rarity a badge of honor for the dedicated few who can claim it. You won’t find this elusive mount easily; it’s not doled out through random drops or purchased with in-game currency. Instead, you’ve got to prove your mettle by conquering the Layer 8 challenge in The Twisting Corridors.

Now, keep in mind that The Twisting Corridors aren’t your average Torghast runs. They’re longer, tougher, and demand a solid strategy to reach the end. You’re looking at 18 grueling floors of foes that will test every aspect of your gameplay. It’s a slog, but it’s worth it.

When you finally emerge victorious, the Corridor Creeper is yours, and it comes with a special perk: it’s one of the rare mounts you can ride in The Maw, where most others can’t go. That’s not just a cool factor; it’s a practical advantage that’ll make your time in that bleak landscape a bit more bearable.

Sylverian Dreamer’s Charm

While the Corridor Creeper rewards your tenacity in Torghast, the Sylverian Dreamer’s Charm offers a glimpse into the whimsical, rewarding collectors with a mount that embodies the magic of Azeroth. The Sylverian Dreamer isn’t just a means of transport; it’s a testament to your dedication to the game’s rich lore and your love for its enchanting aesthetics.

To obtain this ethereal creature, you’ll need to keep an eye on the in-game store or special promotions. It’s not something you can simply stumble upon in the wild or earn through a questline. Once you’ve secured the Sylverian Dreamer’s Charm, this majestic mount is yours for the taking, ready to soar through the skies of the Dragon Isles with grace and elegance.

Its appearance is nothing short of breathtaking, with shimmering wings and a sleek, celestial design that makes it stand out among other mounts. It’s also a versatile companion, able to navigate both land and air with ease. Remember, while it mightn’t be the rarest mount in WoW, the Sylverian Dreamer carries a charm that’s hard to resist. It’s a perfect pick for players who value beauty just as much as functionality in their in-game steeds.

The Spectral Pterrorwing Quest

Embark on a journey to the Shadowlands, where you’ll brave the challenges of ‘The Spectral Pterrorwing Quest’ to claim a ghostly mount that rivals the night sky in its mystique. This spectral creature isn’t only a status symbol but also a testament to your dedication and skill in World of Warcraft’s Dragonflight.

To start, you’ll need to make your way to the ethereal wastelands of the Shadowlands. Once there, seek out the quest giver, an enigmatic figure shrouded in whispers of ancient magic. They’ll set you on your path with riddles and tasks that’ll test your mettle.

You’ll face down formidable foes, solve cryptic puzzles, and navigate treacherous terrain. Each step brings you closer to the Pterrorwing, but don’t let your guard down; the Shadowlands are unforgiving, and one misstep could send you spiraling into the abyss.

As you complete the final challenge, the Pterrorwing will materialize before you, a ghostly presence glowing with an otherworldly light. Mount up, and you’ll soar on wings of spectral energy, a haunting silhouette against the starlit backdrop of the Dragonflight skies. Your perseverance has paid off, and the Spectral Pterrorwing is yours to command.

Vengeance’s Reins Achievement

Unlock the prestigious Vengeance’s Reins Achievement by defeating the formidable Sylvanas Windrunner in the Sanctum of Domination on Mythic difficulty, a true testament to your mastery in World of Warcraft’s Dragonflight. This mount isn’t just a status symbol; it’s a ride that screams victory and perseverance.

You’ll need to gather a group of seasoned adventurers, as taking down Sylvanas at this level demands coordination, skill, and a deep understanding of the encounter’s mechanics.

Don’t underestimate the preparation required. You’ll need to optimize your gear, fine-tune your talents, and stock up on necessary consumables. Study the fight, learn the patterns, and be ready to adapt quickly. Communication with your team is crucial, as is the ability to execute strategies flawlessly under pressure.

Once you’ve achieved this monumental feat, the Vengeance’s Reins mount will be yours—a sleek, dark steed enveloped in the remnants of Sylvanas’s own vengeful energy. It’s not just a means of transport; it’s a trophy that tells the world you’ve conquered one of the most challenging bosses in Dragonflight. Ride with pride, knowing you’ve earned one of the most coveted mounts in the game.

Shadowbarb Drone’s Lifecycle

After conquering the challenge of Vengeance’s Reins, you might be intrigued by the unique journey of acquiring the Shadowbarb Drone, a mount that requires nurturing from egg to fully grown companion. This isn’t your typical mount quest; it’s a commitment, a series of daily tasks that’ll test your dedication over several weeks.

You’ll start by finding a Voidtouched Egg in Uldum during the Aqir Assaults. Take care of this egg, and you’ll see it hatch into a larva. From there, you’re in for a ride—literally and figuratively. You’ll feed and protect your larva, bonding with it through various adventures and missions.

As days pass, you’ll witness its growth from a wriggly larva to a pupating critter, until one day, it transforms into the magnificent Shadowbarb Drone.

Gilded Prowler’s Elegance

Delve into the world of Ardenweald to earn the Gilded Prowler mount, a symbol of grace and mobility that reflects the elegant aesthetics of its ethereal homeland. With its sleek design and shimmery golden accents, the Gilded Prowler stands out as a true masterpiece among Dragonflight mounts. You’ll find that this mount isn’t just about looks; it’s also incredibly agile, capable of traversing the varied terrains of the Shadowlands with ease.

To claim this prestigious mount, you’ll need to immerse yourself in the Ardenweald’s quests and challenges. It’s a journey that requires dedication, but it’s well worth the effort. As you bond with the denizens of this mystical forest and rise through the ranks of the Night Fae Covenant, the path to obtaining the Gilded Prowler becomes clear.

Alabaster Mounts: Pure Prestige

Embodying the epitome of distinction, the Alabaster Mounts await your mastery as symbols of World of Warcraft’s 15th anniversary celebration. These mounts aren’t just any collectibles; they’re a statement, a nod to your dedication and the grand history of the game.

You’ll find two variations to choose from: the Alabaster Stormtalon for Alliance enthusiasts and the Alabaster Thunderwing for those loyal to the Horde.

To claim one of these prestigious beasts, you’ll have to show your allegiance not just in-game but also in your willingness to celebrate the legacy. These aren’t mounts you’ll stumble upon during your usual quests or dungeon raids. They’re purchased directly from the in-game shop or obtained via a special promotion, making them exclusive to those who seize the opportunity.

Once you’ve acquired an Alabaster Mount, you’re riding more than just a rare creature; you’re carrying a piece of WoW history. The sleek, polished stone finish on these mounts reflects light in a way that’ll catch the eye of fellow adventurers from across Azeroth.

It’s not just about the aesthetics, though. Sporting an Alabaster Mount is a clear signal to others that you’re a player of prestige and pride.

Conclusion

You’ve now glimpsed the pinnacle of dragonflight mounts, each with a unique allure. Whether you’re soaring on the Ascendant’s Aquilon, traversing time with an Infinite Drake, or parading on the pristine Alabaster, these beasts elevate your WoW experience.

Embrace the challenge, earn these prestigious steeds, and stand out in Azeroth. Your adventure awaits; it’s time to claim the skies and showcase your mastery with these top-tier companions.

Mount up and let your legend take flight.

Visit the blog to learn about the latest news in the world of Azeroth.

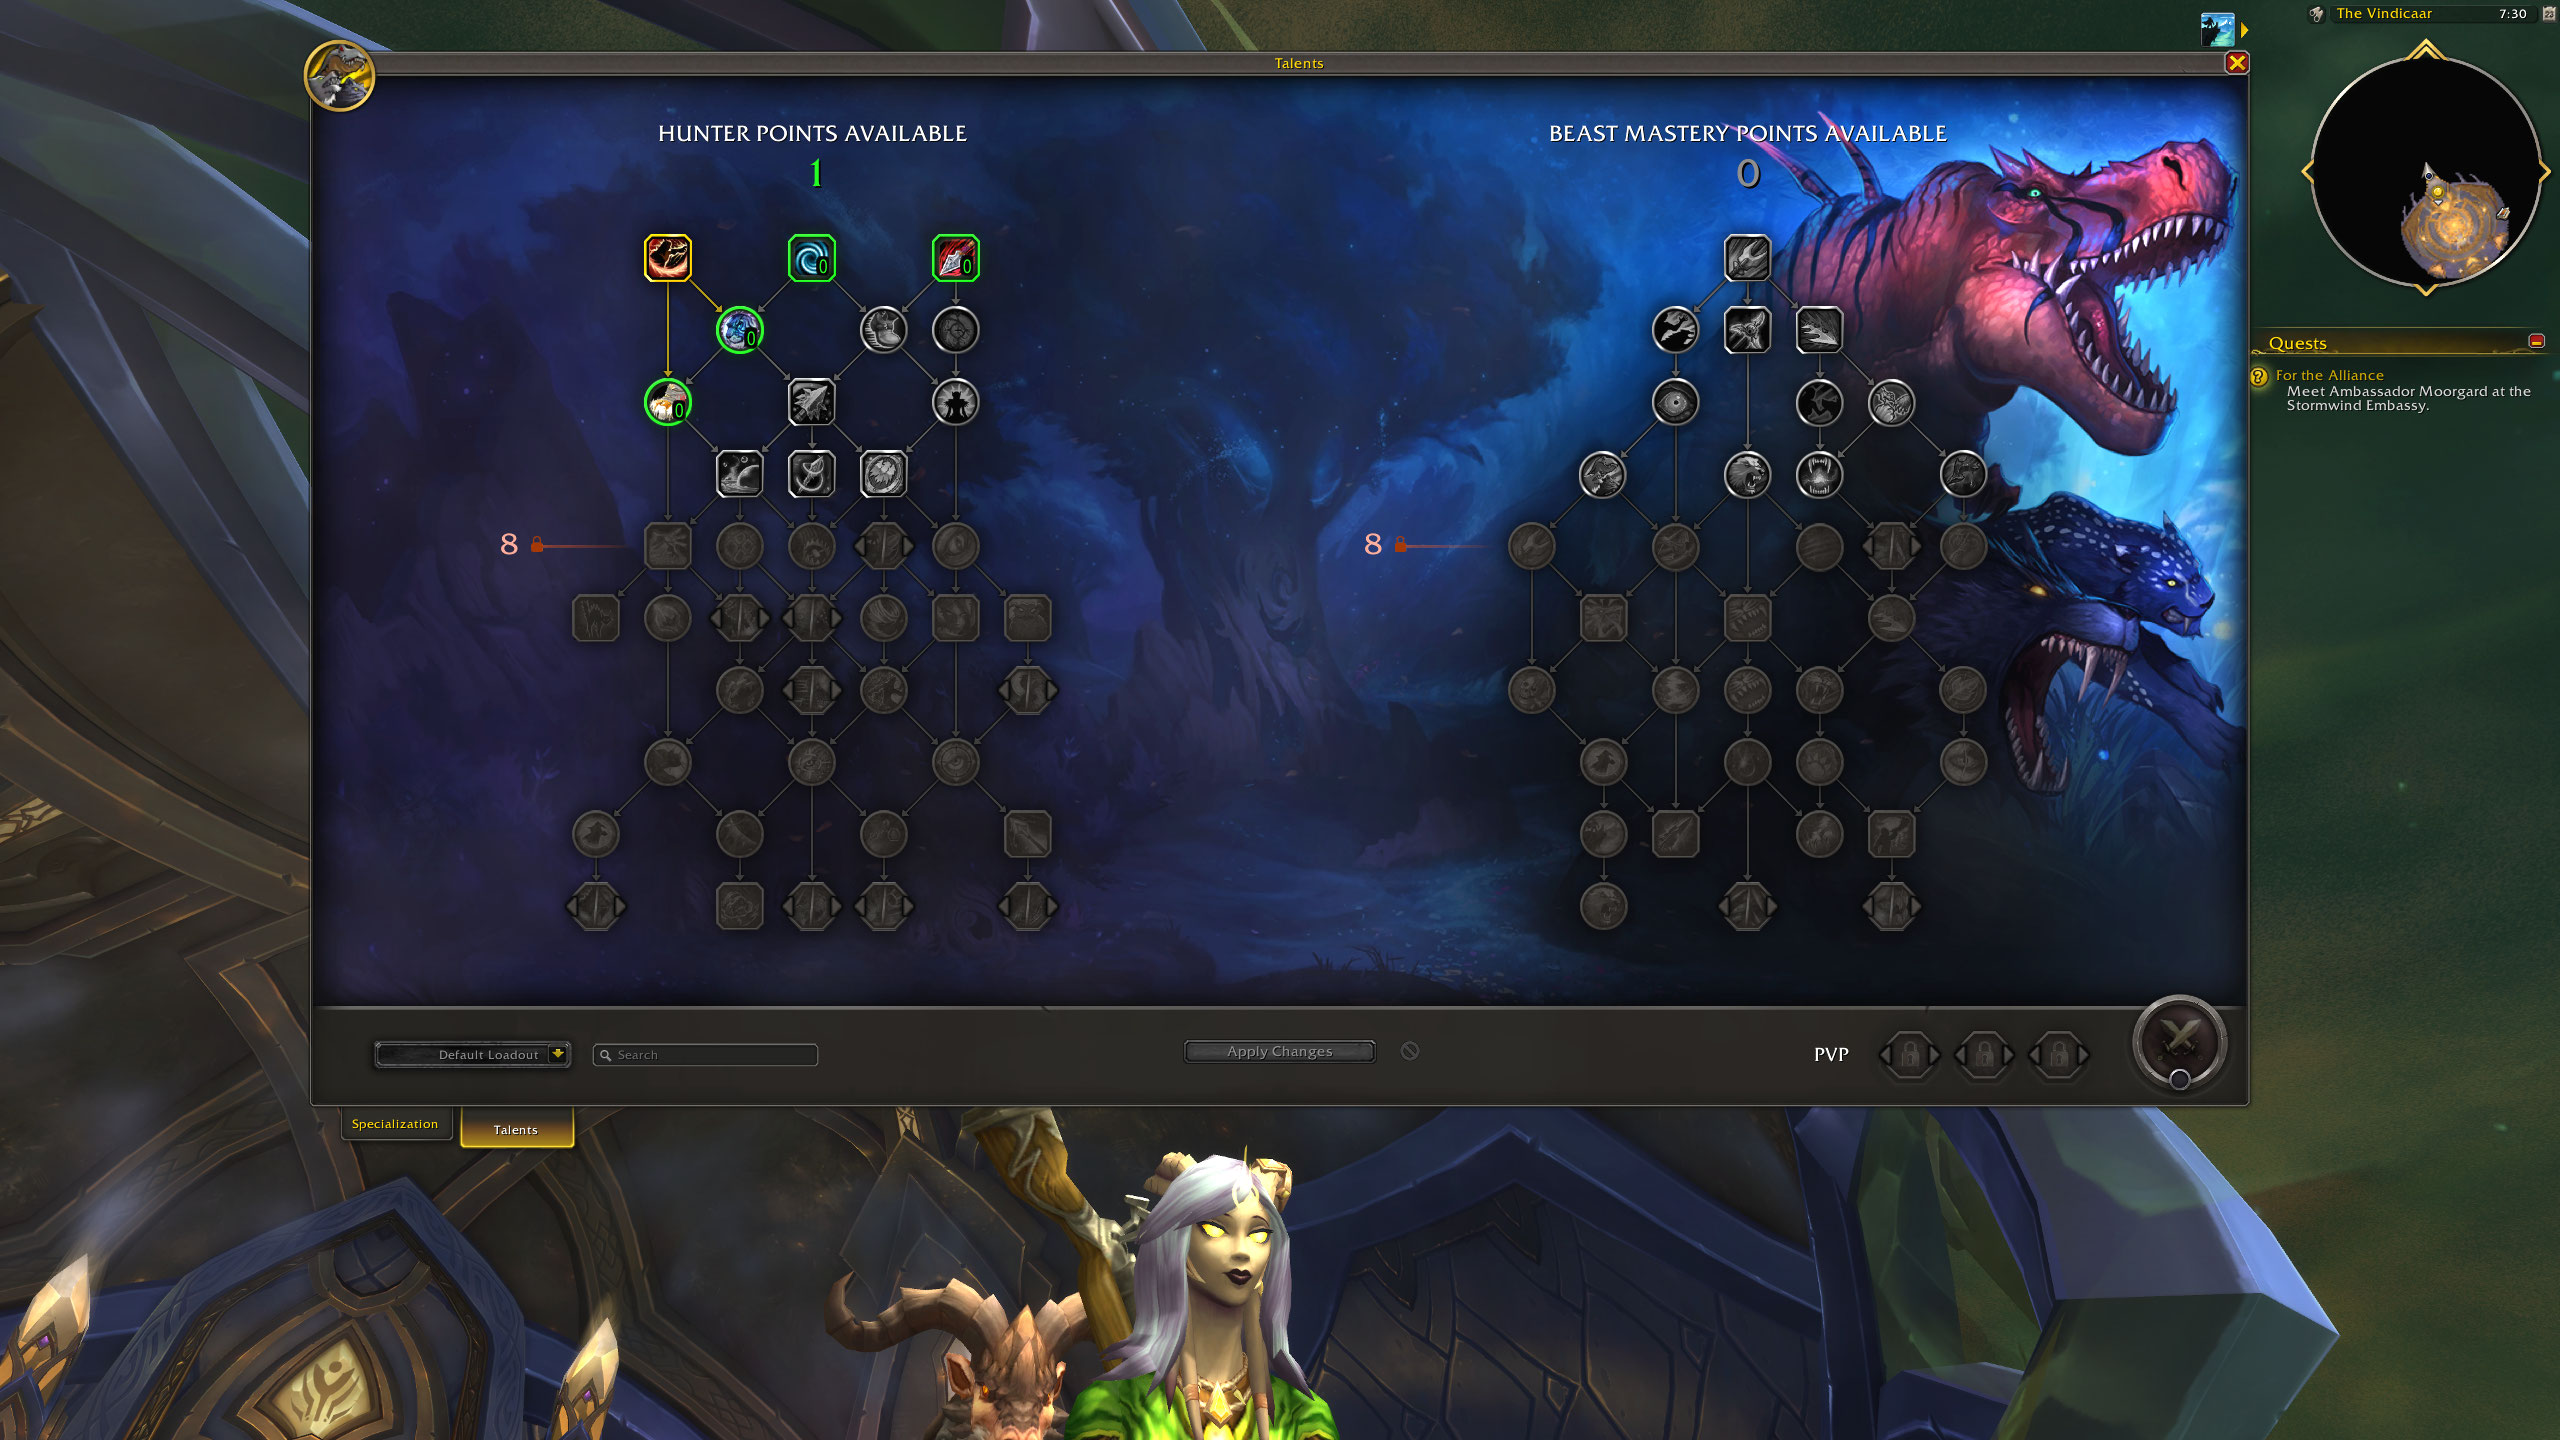
Dragonflight WoW Calculator: Optimize Your Build

In the world of Azeroth, where every choice can be the difference between victory and defeat, you know that optimizing your character’s build is crucial.

As you navigate the intricate landscape of ‘Dragonflight’, you’ll find the WoW Calculator to be an indispensable tool in your arsenal. It’s designed to fine-tune your talents, gear selection, and stat priorities, ensuring your character stands tall against the fiercest of foes.

You’ll learn to maximize talent efficiency and make gear choices that complement your playstyle. But there’s more to this calculator than meets the eye.

Understanding the nuances of its advanced customization options can set you apart from the average adventurer. Stay with us, as we’re about to reveal insights that could elevate your game to new heights.

Understanding the Calculator

To fully harness the Dragonflight WoW Calculator, you’ll need to grasp its core functions and how they directly impact your gameplay strategy. This intricate tool is designed to guide you through the talent tree, allowing for a personalized talent revamp that aligns with your preferred playstyle. Every choice you make within the calculator can significantly alter your character’s abilities and performance, emphasizing the weight of player decision-making in character optimization.

You’ll navigate through a myriad of options that can either streamline your character for a specific role or enable a more versatile approach to tackle various in-game scenarios. The calculator’s interface presents you with a visual representation of the talent tree, making it easier to plot your path towards the most effective skill combinations. It’s not just about picking the strongest talents but also about how they synergize with your gameplay.

Your task is to balance the raw power of certain talents against the utility and adaptability of others. By carefully considering each option, you’re not just building a character—you’re crafting a unique gaming experience tailored to how you want to conquer the challenges of Azeroth. Remember, there’s no one-size-fits-all solution; the Dragonflight WoW Calculator is there to ensure your avatar reflects your strategic insight and gaming finesse.

Maximizing Talent Efficiency

Having understood the calculator’s core functions, you’re now equipped to maximize talent efficiency and make every point count towards your character’s prowess. Your goal is to navigate the specialization tree with a strategic eye, ensuring that each talent point amplifies your character’s strengths, whether that’s dishing out additional damage or bolstering defensive abilities.

As you plot your course through the tree, you’ll face complicated choices. Some paths offer enticing power spikes in the form of major abilities, but don’t rush to these without considering the supporting talents that might better round out your build. It’s not just about the big, flashy skills; it’s the synergy between talents that often carves the path to victory.

Consider, for instance, the trade-offs between a passive boost that consistently ups your output and an active skill that could change the tide of battle when used judiciously. Balance is key. Prioritize talents that complement your playstyle and the role you aim to fulfill within your group or raid.

Gear Selection Strategies

Selecting the right gear is as crucial as optimizing talents, directly impacting your character’s performance and effectiveness in combat. When you’re piecing together your armor and weapons, you’ve got to consider how they’ll synergize with your spec tree and basic abilities. It’s not just about snagging the highest item level; it’s about crafting a loadout that complements the versions of talent trees you’ve chosen.

Let’s talk enchants. Don’t overlook the potential of a good feet enchant. This could mean the difference between dodging a fatal blow and taking a dirt nap. It can enhance your mobility or even give you a much-needed stat boost.

The same goes for a belt enchant—though it might seem minor compared to other gear, the right enchant can significantly amplify your power.

Analyzing Stat Priorities

While appropriate gear enchants bolster your combat prowess, understanding and prioritizing your character’s stats will further sharpen your effectiveness on the battlefield. Unlike previous talents that may have dictated your playstyle, Dragonflight’s WoW Calculator assists you in refining stat priorities to align with your majority of abilities.

Stat priorities vary significantly between classes and even within different specializations. You’ll want to focus on stats that enhance your role—whether you’re dealing damage, healing allies, or soaking up damage at the frontline. Damage dealers often prioritize critical strike or haste, healers might value mastery or versatility, and tanks commonly seek out stamina and versatility. Keep in mind that passive bonuses from your selected talents can influence these priorities, sometimes making a less obvious stat more valuable.

Remember that optional bonuses, like those from consumables or temporary buffs, should complement your core stat priorities rather than replace them. It’s a balancing act; stacking one stat might boost a particular aspect of your performance, but neglecting others could leave you suboptimal. Use the WoW Calculator to simulate different scenarios, ensuring you’re making the most out of your gear choices and the synergies within your abilities.

Advanced Customization Tips

To take your character’s performance to the next level, delve into the WoW Calculator’s advanced customization options to fine-tune your stats and talents. With the Dragonflight expansion, you’ve got access to a whole new swath of abilities. It’s not just about choosing any skill; it’s about selecting the most accessible path for your playstyle. Don’t overlook details, like the wrist enchant option, which could give you that slight edge in raids or PvP encounters.

Moreover, if you’re someone who switches roles frequently, make use of the off-spec buttons. These allow you to create and save different builds quickly, making it a breeze to switch from a damage-dealing setup to a healing or tanking configuration. It’s particularly handy in the pre-patch phase when you’re still testing the waters with the new class updates and figuring out what works best for you.

Conclusion

Now that you’ve mastered the dragonflight WoW calculator, you’re ready to perfect your build. With the right talents, gear, and stat priorities, you’ll maximize your character’s potential.

Remember to keep tweaking and customizing; the battlefield’s always changing, and so should your strategy.

Dive in, experiment, and watch as your prowess soars. It’s your adventure—make every skill point count and dominate Azeroth like never before!

Visit the blog to learn about the latest news in the world of Azeroth.